
Over the years I have experimented with a lot of different ways to bind books. After learning to bind flat sheets with glue using the perfectbinding process, I moved on to more advanced methods involving folding and stitching signatures and attaching them to hard covers. Casebinding is a great way to add beauty and durability to books, and to protect the pages from unnecessary wear in normal handling. These sturdy and handsome books just feel really good to hold and to read. The coptic stitching and casebinding processes are lengthy compared to softcover perfectbinding, but the results are far superior.

Detail showing arched inner spine
A properly made book of this type should lay open easily without damage to the spine, and of course, close satisfactorily and remain so. The inner spine should form an arch, bending away from the case, allowing the leaves to lay over to either side.

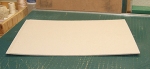
Four sheets of paper nest to make a 16-page signature
Planning the text layout is the first step in building a book. Beyond all the regular page conventions regarding margins, gutters, type selection and formatting to position the text properly on each page, the layout must be imposed for the press sheet. This process locates each page so that when the press sheet is folded down into signatures, the pages are ordered properly. Four-page signatures are easily accommodated in most word processing programs by use of a booklet utility, which will order and position the pages automatically. Eight or more pages per signature are usually handled by the digital printer with special imposition software.Sixteen-page signatures are the most common, consisting of four sheets of paper inserted within each other. However, any number divisible by four will work.

Ten 16-page signatures stack to make a 160 page book
The signatures are stacked and stitched into place next to each other by any of several methods. Coptic stitching binds the pages to each signature and the signatures to each other to create an assembly called the text block. The text block is glued to a flexible mull with wings that will attach to the cover boards.

Flat vs. round backs
There are basically two kinds of spines: flat and rounded. The rounded spine is more traditional and was developed to reduce the added bulk offered by the cord used to stitch the signatures. The additional spread is fanned out at the spine, resulting in a book that is more uniform in thickness. The flat type, sometimes known as smyth sewn, utilizes finer thread and more stitches to overcome the same problem. Either method results in a durable binding that will stand up to normal usage for many years.
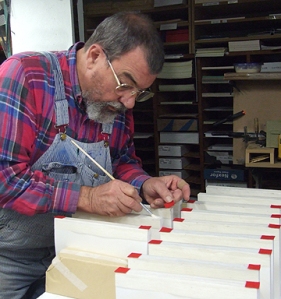
If you decide to bind your own books, a lot of your time will be invested in doing so. If you value your time, it only stands to reason that you should use the very best materials that you can lay your hands on. However, I would suggest that the beginner start with anything they can get for the purpose of learning. Good stitching technique takes practice. I know I made at least ten books from start to finish before I had anything that I was unashamed to show. My first efforts were crooked, too tight on one end or too loose. I missed stitches and tore out holes. I had big nasty knots that bulged at the spine, and my books didn’t open or close properly.
But now, with thousands of stitches behind me, I can say they are looking quite respectable. It takes time and patience to get it right. Learn when and where to tug on the thread, and how hard to pull so that it is just snug. Concentrate on consistency so that your stitching looks even and orderly. I spent a lot of evenings in a comfortable chair stitching signatures and listening to a TV or radio program.

Home-made stitching loom for Coptic stitching.
During this sojourn into stitching signatures, try out different types and weights of thread, different needles and spacing between stitches. Check out the difference between using waxed vs. unwaxed thread. Read up on the various methods of stitching with cords or bands. Try your hand at ethiopian coptic stitches or try to emulate smyth sewing. Any of these methods will produce good books. It is really only a matter of choosing the way you are most comfortable with and then practicing until you get it right.
I like waxed thread and stitching with bands made from scrap bookcloth. For my 6×9 journals I use three bands each 1.25″ wide. I punch eight holes into four sheets at a time making sixteen page signatures. I use the kettle stitch on each end and loop through the cross stitch over each band to tie the signatures together. I keep my stitches snug by tugging parallel and tight to the spine at the end of each course.
Endsheets go before and after the textblock. One leaf is glued to the cover board and folds to make the first and last loose pages. They serve as hinges between the cover and the pages. Although many bookbinders will add the endsheets afterward using glue, I prefer to stitch my endsheets to the textblock.

Applying first coat of PVA
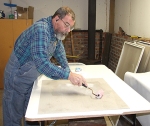
When the assembly and stitching of the textblock is complete, I apply a single coat of PVA cement over the threads and between the signatures at the spine, making sure that the block is nice and square and not twisted.

Gently rounding the spine
Once the PVA has set up a bit (not tacky, but still workable), I round the spine by pinching the textblock and hammering lightly along the seams, driving the outside pages slightly away from the center ones. By gently working the spine alternately from side to side using the hammer and your hands, the spine takes on a rounded appearance, and the leaf side opposite the spine has a marked concave shape to the block.
I work the block until it is almost to the desired shape, but yet a little flat, and at this point I choose to trim the three sides on the guillotine cutter. I then finish rounding of the spine, which results in a much shallower concave profile on the leaf side. Alternately, I could round the spine completely before trimming in order to produce a flat result.

I made a pseudo headband using a Post-It note wrapped around a piece of twine. The clamp is used to help maintain the spine’s shape as the glue is applied.

Rounded and square bindings
When the spine is rounded and the block trimmed to my satisfaction, I apply another coat of PVA. To this I add the mull and attach decorative headbands. A final coat of PVA is applied over the entire spine and allowed to dry completely. I should mention here that up until now a lot of effort is made to ensure that the textblock is shaped properly. If it is not cut squarely or is lopsided it will be impossible to correct beyond this point.

Spine laminates and bookboards
The cover base is made from davey board and construction paper. I cut my boards the same width as the nominal page width and 3/8″ taller. The spine width is determined by holding the boards in place and wrapping a piece of paper around the spine. Score the paper by running a fingernail along the edge of the boards. Transfer this measurement to two pieces of construction paper and score them similarly. I made a jig for forming a round spine by gluing the two pieces together around a piece of PVC pipe inset between two boards. I assemble the two pieces of scored construction paper with PVA between, working them until they form tightly around the curve of the jig. You will have to experiment a little to find the right size pipe and inset specs to make it work for your book, or if you are a competent scrapbooker and crafter, you can just form the sandwich by hand and eyeball it to get the right shape.

Rounded spine jig for laminating

Trimming the laminated spine
Trim the wings from the bottom layer so that only one pair extends to approximately 3/4 to 1 inch to either side. Assemble the boards by gluing to the wings either side of the spine, leaving a small gap equal to the thickness of the bookboard between the spine and the boards. Adjust the curve of the spine if needed to approximate the textblock thickness by placing weights on the boards and allow to dry.
A simple but very nice effect can be added at this point by gluing paper cutouts to the davey board prior to covering with bookcloth, producing an embossed look. I like to glue bands across the spine to represent the cords used in medieval binding.

Any sort of shapes can be used
Any number of shapes can be utilized to create depth. But there are limits. A bit of experimenting will help you to find the right thicknesses and shapes to use to achieve the right effect. To be successful at this bookbinding stuff, one has to dive in there and make a lot of books. Doing so will increase your knowledge of materials and methods. It will also increase your reverence for those that went before us in pioneering the art, develop your style and hone your craft to a more respectable level.

Gluing Decorative Spine Bands onto the formed spine.
Anybody can cobble a book together. It is the fine points and the details that set the novices apart from the true crafter. Choosing the right covering for your book is part of that experience thing. It took me a while to discover the right properties, mainly because I ignored the bookbinding suppliers at first, being mesmerized by the selection of fabrics at JoAnn’s. I used transfer adhesive to stick the fabric to the boards and they looked great! At first, it seemed the way to go because for one thing, the bb suppliers had a minimum order policy. What was I going to do with ten yards of the same material? I wanted variety, man! Besides, the dealers only had limited choices.
The fabric stores had a rainbow of colors and surfaces, and I could purchase small amounts. But as my journey continued, I began to see that my earlier books were starting to sag, looking tired and even wrinkled. I discovered that the adhesive I had used was starting to fail after about four years. This was not good. I had settled on transfer adhesive because it was not as messy as glue. Production orders could be processed in less time with no risk of damaging the books with glue on unwanted surfaces. It seemed a no-brainer.
But now I think that was a mistake. Bookcloth is designed for the purpose of covering books. It is stiffer than regular cloth and it has a coating on the back side that prevents the application of liquid glue from bleeding through to the front side. In comparing costs, I found that the cost of the transfer adhesive plus the fabric exceeded the cost of real bookcloth and liquid adhesive! (Dang! Those bookbinder guys really have it together!).

Rubbing down the cover with a stylus to enhance the cutouts
But now I had to learn to use the liquid glue, despite the obvious drawbacks. So I opened my mind and researched the process. To my surprise, I found it to be not so difficult and very beneficial. In fact, I kicked myself for taking four years to discover it. (Dang again!). The two main things that sold me on PVA were the much lower cost and its versatility. Once I learned to work with it I decided it was the only way to go. Here is a good tutorial on gluing by a master craftsman. In fact, I recommend watching all of his videos for dozens of good tips on bookbinding. Remember, it’s the details and fine points that set you apart from the others.
I like to have a one inch wrap margin for my covers. I start by coating the bookboards and spine with PVA using a roller. I then center the bookcloth and proceed to rub it down starting from the spine and working outward, being careful to push the cloth down into the crevices with my fingers as I go. Once I have it fairly smooth and even, I trim the corners at 45 degrees and wrap the long sides first, taking care to burnish the surface well, and wiping off excess glue with a damp cloth. Then I crimp the corners and turn the short sides in.

Using a bone folder to burnish bonded leather to the formed spine

Paper and string beneath bonded leather bookcloth
To finish, I continue to rub and burnish the bookcloth, using a stylus and bone folder to work the surface to form around the cutouts, to produce the embossed effect. The finished cover should be placed under weights to ensure that the bookboards dry flat, due to the wet adhesive applied to only one side. Otherwise they will curl as the glue cures. Be sure that all the glue has set and the cover is dry and the boards are flat before proceeding to the final assembly.

Finished Half Leather Journal
Next time I will be covering the process of making and attaching end sheets as well as final assembly into a finished book.
I welcome comments and any suggestions you might have for future articles. I love to talk and write about bookbinding and publishing, so hit me with some feedback!
Until next time,
Michael

 Though it has been nearly two years since I have posted to my blog, I now have something new that’s worth writing about!


")
 closeup")


